Today’s word is Immerse (which is now actually yesterday’s word when I started writing) This word is perfect for this post. Let me explain. When I log in to my WordPress account, the daily reader is the first thing I see. It is a list of other member’s blog posts, and as a way to give bloggers inspiration they include a “word of the day” and today’s word is immerse.
Well let me tell you, I am absolutely IMMERSED in my new book and my new culinary adventure. As I wrote in my previous post, I am determined to make as many recipes from my new book “Le Cordon Bleu At Home” as possible, and being the good Virgo that I am, I am starting with Lesson 1.
Each Lesson (there are nearly 100) has a collection of recipes, a menu of sorts. It usually includes a starter recipe (salad, soup, or other small, opening dish) followed by a meat or main course recipe, then a complimentary side dish recipe (usually a vegetable dish), and finally a dessert recipe. So, yes, that makes it somewhere close to 400 or so recipes total.
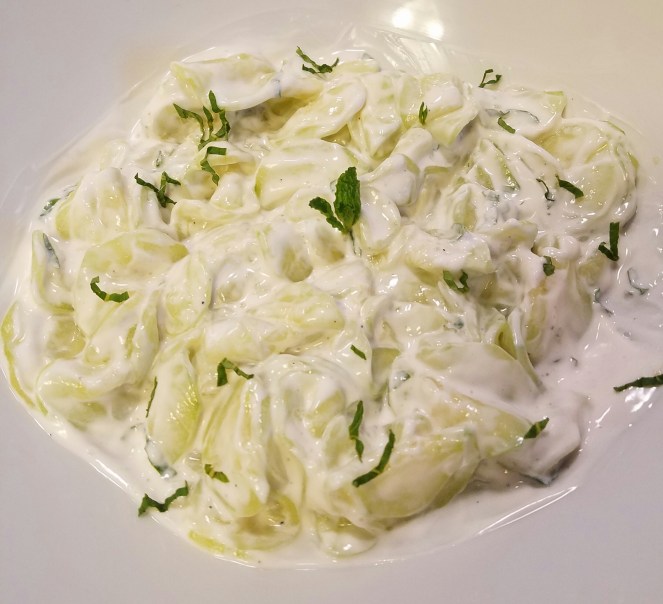
So, depending on ingredient availability as well as my taste buds, I pick and choose the recipes from the lessons based on what I feel like eating. Well, that makes sense. So, I read through Lesson 1, and I begin to get inspired. I can almost taste the food in the recipes, yup, this works. The first course is a salad of cucumber and mint. Simple enough. This preparation teaches the traditional French way for preparing the cucumbers (which I am already familiar) and it was good to have confirmation that my preparation is correct. Basically, the cucumbers are peeled and sliced, then placed in a colander and salted. This pulls out the moisture from the cucumbers which actually (in my opinion) allows the dressing to cling to the cucumber much better. Cucumbers have so much moisture that it can thin out a dressing and make the dish watery. This simple recipe is one that can be built on simply by changing the dressing base and the herbs.
So, I prepare the cucumbers. They are peeled, sliced, salted, and draining. Now for the dressing. The dressing is so simple. I think that’s what I like about these recipes, not only are they traditional, but they do not over use ingredients. This dressing is basically plain yogurt, red wine vinegar, fresh ground pepper, and mint. That’s it. No need to salt because the cucumbers were salted previously and will hold that salt.
As I mentioned previously,this simple recipe is one that can be built on simply by changing the dressing base and the herbs. You could substitute sour cream, creme fraiche, mayonnaise, and even olive oil in this recipe, and the herbs can be just about anything you like and they can be mixed as well. Whether it be chives, parsley, chervil, tarragon, oregano, or basil. The combinations are endless.
Here’s the Recipe:
2 lbs. of cucumbers (any variety). The original recipe calls for either small pickling cucumbers or hot house cucumbers. I used a regular cucumber and it was just fine. The purpose for using those types are that there are fewer and/or smaller seeds. Peel and slice the cucumbers. Don’t slice them too thin or they will literally fall apart during the salting process. Place the slices in a colander. Toss them around with 2 tsp. of salt. I used sea salt. If you are using a regular “Morton salt” type product, you may want to cut back a little. Let the slices sit and drain for at least 30 minutes. In the mean time make the dressing. 3/4 cup of plain yogurt, 1 TB of red wine vinegar, some fresh ground pepper, and 12 mint leaves (stack 10 of the leaves, roll them up, then slice into thin slivers, called a chiffonade), reserving 2 leaves for garnish. Mix the yogurt, vinegar, pepper and the chiffonade of mint in a bowl. Take the salted cucumbers and wring them out in a clean towel, paper towel, or by hand. You can rinse them first if desired. Your best bet is to taste one and check the salt level. Remember, they do need to be a little salty as that is the only way the dish is seasoned. Then add the wrung out cucumbers to the bowl with the dressing and toss to mix. Garnish with reserved mint leaves. Voila!
Now on to the main course. Roast chicken. Who doesn’t love a classic roast chicken. I don’t care how many roast chickens I have made in the past, I have never made a Le Cordon Bleu roast chicken. Roasting is a method which uses a dry, high, heat. Prior to the convenience of ovens this would be done over a fire on a rotating spit. (Now, this explains the technique in the recipe. I’ll elaborate shortly).
The rules of roasting is; if there is enough natural fat it is suitable for this method. If the protein is lacking natural fat, there are ways to “bard” (add fat) to accommodate this method. Lean meats, and those that contain a lot of connective tissue do not do well with this technique. A braise (the addition of moisture) is more suitable.
The meat and poultry that will be roasted are usually trussed to maintain the shape. There is a tutorial demonstrating the proper technique to do this. However, I need to make a slight adaptation as my chicken is missing most of the wing. That’s fine, I’ll make it work.
The roasting pan also needs to be just slightly larger than the chicken itself. If the pan is too small then too much liquid will build up and stew or boil the chicken, and if the pan is too large all the juices can reduce and burn.
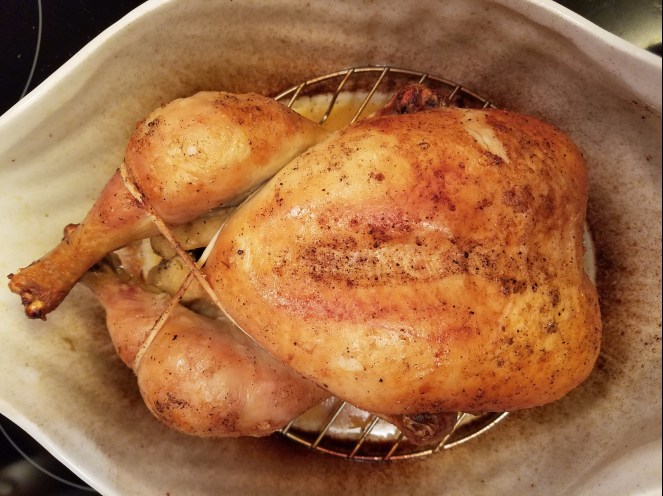
Now, my mother loved roast chicken so much that she purchased a specific chicken roaster, and I have been lucky enough to have inherited this ceramic roaster. Not only is it adorable and functional, but it was my mom’s and that makes it so very special every time I use it. This is what it looks like and it is the perfect size for the average chicken. The high sides also keep the heat in and close to those legs portions which always take longer than the breast.

So, now for the technique. It is something that I have never done before. The chicken gets roasted on it’s side for 20 minutes at 425 degrees. Then gets turned to the opposite side and roasted for another 20 minutes. Finally, it is turned breast side up, and a 1/2 cup of water is added to the pan. I had my chicken on a small rack inside the roaster. The chicken then continues to roast until done, about another 30 minutes or so. Remember the chicken is trussed, so it is best to check either the temperature of the thigh, or prick the thigh and see if the juices run clear. The chicken also needs to rest for about 15 minutes when it comes out of the oven, so there will be a little continuous cooking that will occur while it is resting.
OK, so, as I said, I have made hundreds of roast chickens in my day, but let me tell you, I have never made it this way, but I will make it this way every time I do. This was the juiciest roast chicken I have ever made. I usually follow recipes as they are written to see and taste the final product as described, but next time I won’t be shy, my 1/2 cup of water just turned into wine (Wait! today’s actual word is “Instinct” so that is what I will do and follow my INSTINCT to add wine next time. Yay! two daily words, one post).
The juices that collect in the bottom of the pan will become the sauce that is poured over as it is served. So, I’m sure that any flavor you wish to enhance could be added at the same time, whether it is water, wine, juice, liquor, or whatever. With this basic technique the possibilities are endless. Here is my finished product 🙂
OK, don’t lie, this just made you hungry for chicken?
Here is the recipe that I followed –
1 chicken, no more than 5 pounds. I think mine was between 4 and 5, closer to 4. I washed and dried the chicken inside and out, then patted it completely dry. I seasoned the cavity with salt and pepper, then I took a clove of garlic, a bay leaf, and some sprigs of fresh time and placed them inside the cavity. (Again, this recipe can be adapted in so many ways. The cavity can be stuffed with anything you can think of. Lemons, onions, fennel, a variety of herbs and spices, it’s endless) So, once the cavity is filled, the chicken is trussed closed.
Next, take a few TB of unsalted butter and a drizzle of oil and rub it all over the outside of the chicken. Lastly, season the whole bird with salt and fresh ground pepper (or add additional spices as you like). Then roast it as described above in a 425 degree oven until done. Remember, you start it on one side, 20 minutes later, you turn it to the other side, after an additional 20 minutes (so 40 minutes total so far) you turn it breast side up to finish roasting. You then add 1/2 cup water (or other liquid) to the pan at this point and let it finish roasting for an additional 20 to 30 or more minutes until the juices run clear after being pricked in the the thigh portion with a skewer, or take a temperature reading. This technique mimics the rotisserie method over the fire by turning it much in the same way! Brilliant!
After the chicken is removed from the oven it gets transferred to a platter to rest. (I actually tipped the chicken so all the juices that collected in the cavity poured back into the pan). Then cover the chicken in foil to keep it warm. While the chicken is resting, spoon the fat from the juices that collected in the pan and discard. Bring the de-fatted juice to a boil on the stove top, then reduce the heat and simmer until it is reduced by about 1/3rd, then strain. Pour the reduced, strained, juice over the chicken when serving, or serve it on the side, or do a little of both as the recipe suggested. Then enjoy the best roast chicken ever. I’m telling you, this is the beauty of the recipe. Hard? NO, Complex? No, Labor intensive? No, Is it delicious? Absolutely yes! Sometimes simple IS better, and it is all about the technique. So, until the next lesson, make a chicken! 🙂 And, the adventure continues………… Thanks for reading 🙂
